NOTE: Due to blog formatting issues, the following article is best viewed as a PDF, click here.
Constructing the Circle Limit
(Tiling the hyperbolic plane)
Akshay Tiwari
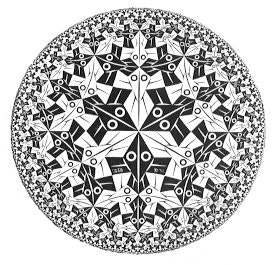
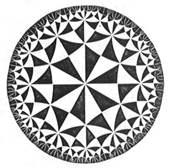
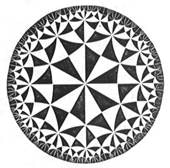
(Circle Limit I by M.C. Escher)
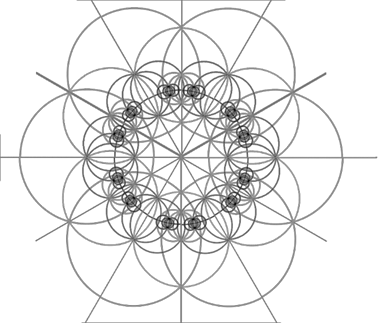
The aim of this article is to simplify the geometric (straight edge and compass) construction of tilings similar to the one above. Escher’s tiling was a result of his correspondence with the mathematician H.S.M. Coxeter who had shared the following tiling :
(Hyperbolic Mosaic by H.S.M. Coxeter)
Considering the fact that Coxeter did not produce this manually himself, it naturally raises the question about who made the above figure. Though that is not the line of enquiry the construction stated in this article is aided by in any way, Escher himself constructed the Circle Limit which to some extent might have followed Coxeter’s exact principles but it is also believed that beyond a certain number of tilings, the tiling by Escher is a rigor through craft than through math. Hence, Escher’s work necessarily shows that a Euclidean construction is possible to represent the tiling but it is not sufficient in showing that it is done in a mathematically accurate way. This article too would be focusing upon the geometric construction of the Circle Limit; except that the method shown here is scalable, procedural and can be iterated until one reaches the physical limitations of the tools and media in use. While doing so, there shall be casual allusions to hyperbolic spaces and constructions to help one gain an intuitive understanding of the math behind crafting the circle limit.
NOTE: It is recommended that one should have elementary knowledge of geometric constructions and familiarity with the concept of a straight edge and compass before continuing to read. There are no proofs involved and some statements are stated with the view to create the base for the main construction in an intuitive way and may not be rigorously explained.
1) Tiling and understanding the Circle Limit:
Tiling was of particular interest to Escher and above one can observe planar 2 dimensional tiling done by him. A plane can be tiled through the repetition of a base shape or permutation of a handful shapes that can be detailed artistically to appear more interesting and relatable. But this is trivial to visually digest as equal sizes appear equal in such planar setting.
The Circle Limit is similarly just a tiling, but it is the tiling of a hyperbolic plane. Hyperbolic geometry assumes the fifth Euclidean postulate false and thus assumes that through a given point there can be more than just one parallel line to a given line. Hyperbolic geometry cannot be intuitively visualised. To visualise it, there are representations that one can use. Poincare’ disc is a model that can be understood through Euclidean geometry and used to represent hyperbolic geometry. Hyperbolic disc shall have its own hyperbolic triangles, segments and so on.
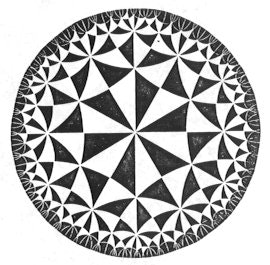
Observing the Hyperbolic mosaic that Escher referred, the central angle is divided into 6 parts (considering one black and white pair to be a whole triangle) giving that one angle of each is 60 degrees. By symmetry, the triangles (formed by black and white pair) are all equilateral. Since it is a tiling of the disc, one can notice that the disc is tiled by hyperbolic equilateral triangles.
Understanding certain geometric properties of the hyperbolic disc and also some constructions would help in the final construction.
2) Gaining intuition for the Hyperbolic disc:
a) Inversion:

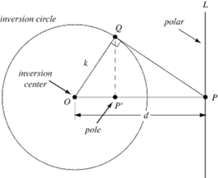
Similar to how a point can be reflected in a line to obtain its reflection, a point can also be ‘reflected’ in a circle to attain its reflection. This reflection though, is called an inversion in the concerned circle. In the above figure, point P’ is an inversion of point P in the shown circle and vice versa.
To understand the construction in the context of inversion:
Let us assume that P is given and P’ is to be located.
The steps would be:
- With respect to (shortened to ‘w.r.t’ from here on) above figure, PR is a tangent to the circle which shall be constructed first.
- From R, dropping a perpendicular on to OP gives the inversion of P i.e. P’.
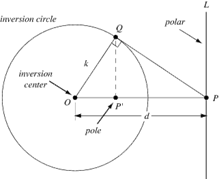

This is an important relation between the circle’s radius and the locations of the point and its inversion. It implies that the closer a point is in the interior of a circle to its centre, its inversion would be located farther in the exterior. As length of OP’ would approach zero, point P would be located almost infinitely away from O. The inversion of O would be located at infinity. Scaling up this inference, it can be considered that every point starting from being right on the circumference till infinity has an inversion within this circle. So every point and hence every element outside of it can be mapped onto its interior. Since the disc can contain all points and elements within it, this could be an independent universe of the disc where all lines are circles and arcs. Such a disc is called a Hyperbolic disc model (or Poincare’ disc model) that is representative of hyperbolic 2D geometry.
As of now, without defining the polar, assume it to be a line perpendicular to the line through the pole and its inversion.
b) Inversions of other geometric elements in a circle:

Similar to Escher’s self-portrait as seen above, inversions of other geometric elements in a circle result in their warped counterparts.
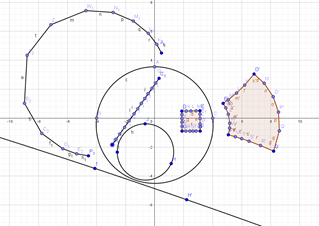
Here, it can be observed that the inversion of a square in a circle results in the warped quadrilateral shown in the right which could be called a hyperbolic square. The inversion of the segment becomes an arc (hyperbolic segment). The inversion of a circle is a circle, though in some cases this might result in the inverted circle (in the exterior here) to become of infinite radius and appear like a line. Inversions of circles can be observed below:
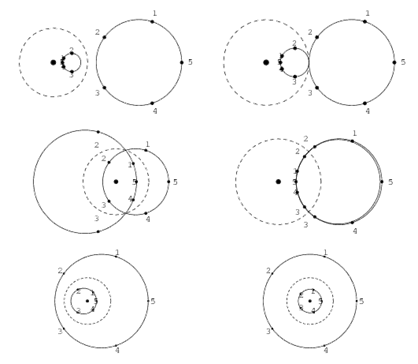
W.r.t above figure, the first two images in the top row have the same circle (in exterior) moving closer to the inversion circle. The inverted circles in the interiors have visually different sizes. But once we have a fair idea of the inversion circle being the hyperbolic disc, these circles in the interior would be hyperbolic circles of the same size. Thus, congruent circles in the hyperbolic disc need not appear congruent.
Note that the centres of these hyperbolic circles are NOT at their geometric centres (their centre would be at the inversion of the outside circle’s centre which would not coincide with the hyperbolic circle’s geometric centre) and one could term them as hyperbolic centre, if that helps by design. The last case can be seen where the hyperbolic circle’s hyperbolic centre coincides with its geometric centre.
Above is a specimen of hyperbolic triangles. The final construction shall be dealing with constructing hyperbolic triangles.
c) Orthogonal circles:
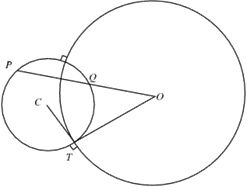

Orthogonal circles are circles that intersect each other at right angles as shown above. They are of particular interest because of their properties as inversions. For e.g. inversion of the circle on the left in the circle on the right is the circle itself and vice versa. Hence, the inversion of point Q in the larger circle would give point P.
Going back to understanding the polar – it is the locus of centres of circles orthogonal to the inversion circle and passing through one point. W.r.t above figure, any circle centred on L and passing through P’ would be orthogonal to the inversion circle.
Considering the above concepts as aids in understanding the construction, the construction of the Circle Limit is as follows:
3) Constructing the Circle Limit:
Observe the central hexagon and notice that the pair of black and white triangles that form a triangle form an isosceles hyperbolic triangle which requires to be tiled across the hyperbolic disc.
An individual triangle (black or white) here has the angles 30, 45, 90 degrees (In hyperbolic triangles, the angles add up to less than 180 degrees). These angles are Pi/6, Pi/4 and Pi/2 radians respectively. Hence such a tiling might also be referred to as a 642 tiling of the hyperbolic disc. The construction here can be performed for tilings with triangles having an angle of Pi/n where n >= 5 and the other two angles are fixed Pi/4 and Pi/2. These triangles tile the whole disc meaning that every hyperbolic triangle is of the same size in the above hyperbolic disc.
In our case the angles involved can be simply constructed with straight edge and compass. Trisecting a right angle would produce the Pi/6 measure which can be copied as and when required.
Straight Edge and Compass Construction:
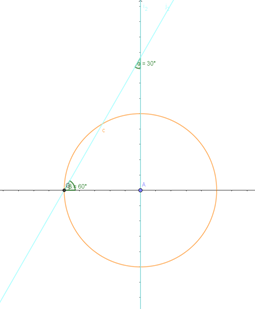
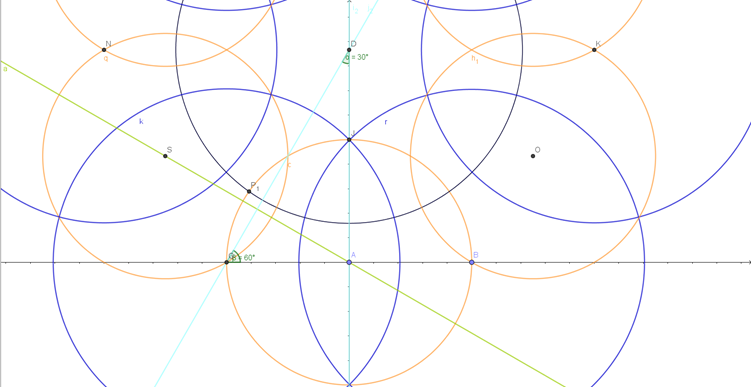
- First off, it is essential to construct the 642 tile i.e. the hyperbolic triangle with angles Pi/6, Pi/4, Pi/2 radians. Construct a circle with an arbitrary radius (orange in figure).
- Construct a pair of perpendicular lines and let one of them intersect the circle at G as shown.
- Construct a line at 60 degrees to intersect the other line at an angle of 30 degrees as shown. Let that point be D.

- Construct a circle with diameter DA intersecting the initial circle at P1 as shown.
- Construct a circle with centre D and radius DP1; this shall be the main disc that would be tiled and is orthogonal to the initial circle (orange). Triangle DHJ is a hyperbolic triangle with angles 30, 45, 90 degrees.
- Theoretically, the tiling could be considered as symmetric operations performed on this tile to cover the entire disc while keeping all distances hyperbolic.
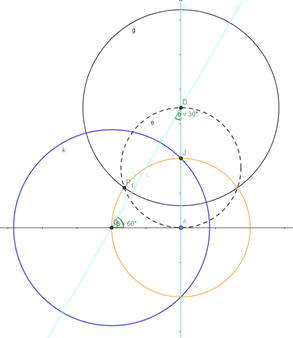
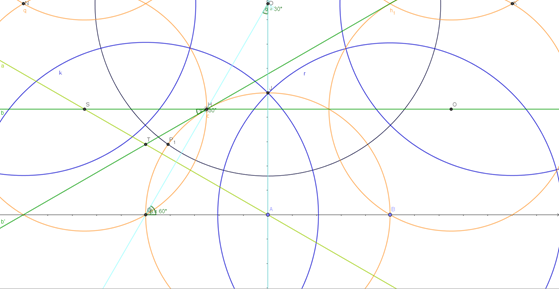
- Next construct a circle centred at G with radius GJ. Observe what this does to the triangle derived earlier. Intuitively, understanding how triangles are warped in the disc, this circle divides the triangle constructed earlier into two congruent triangles (In the hyperbolic disc all similar triangles are congruent which is yet another way to understand how the scale can vary yet the hyperbolic size remains the same while tiling the disc)
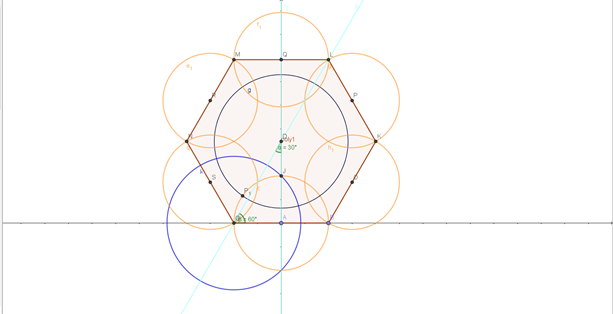
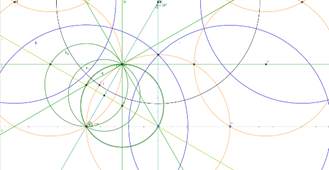
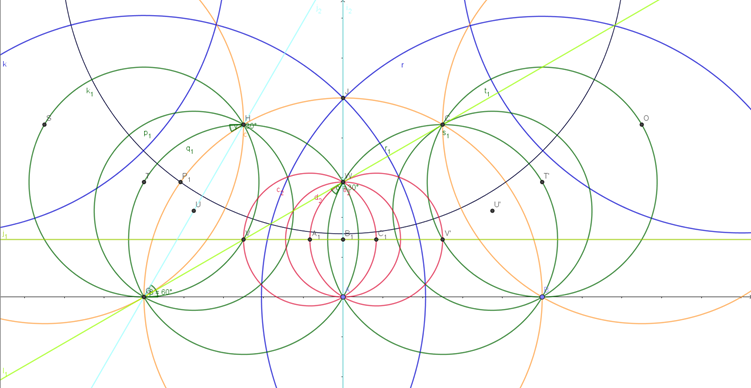
- By symmetry, construct the initial circle c as shown above by rotating around the main disc’s centre by 60 degrees as shown. Constructing the hexagon first may help simplify further construction also.
- Repeat the similar procedure for the second circle as shown above to get the initial hexagon inside the hyperbolic disc. Keep referring to the original hyperbolic tiling to understand how many triangles exist around one vertex and construct the diagram as required. Observing the symmetry and repeating by rotating it shall result in the more intricate result. The focus here on would be upon iterating along one side though.
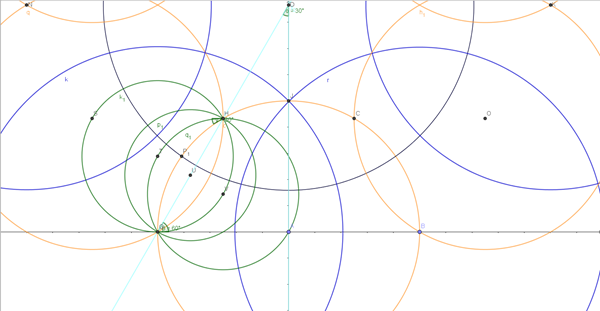
- W.r.t above figure construct the line SA joining centres of the initial circles. This is the polar along which we shall locate centres of other orthogonal circles to tile further triangles.
- Focus on points S, H, A as it could get cluttered while constructing on paper. Join line SH and construct a line 30 degrees to SH at H as shown. Let that intersect SA at T. It can be said that one has rotated SH by 30 degrees to get T.
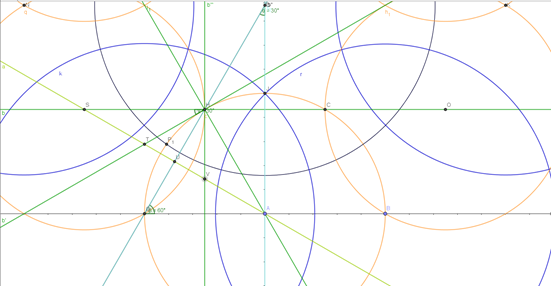
- Further rotating the line by 30 degree increments until it intersects A gives the points U and V on SA.

- Construct circles with centres as the new points starting from T. All shall pass through H which is the pole.
- Now we have orthogonal circles passing through H and centres at T, U, V. Keep track of the newly formed hyperbolic triangles to get a grasp of the procedural way in which this construction is proceeding.
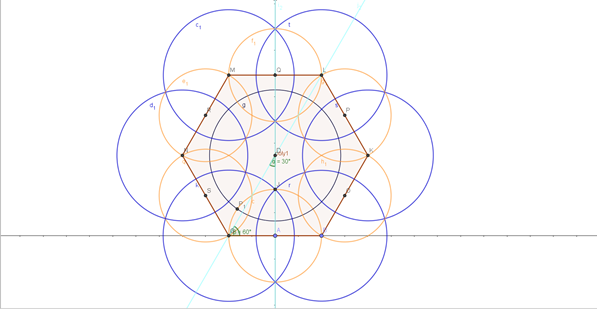
- Erasing the rotated lines will reduce clutter and now this new set of circles shall be replicated by symmetry in the hexagonal arrangement.
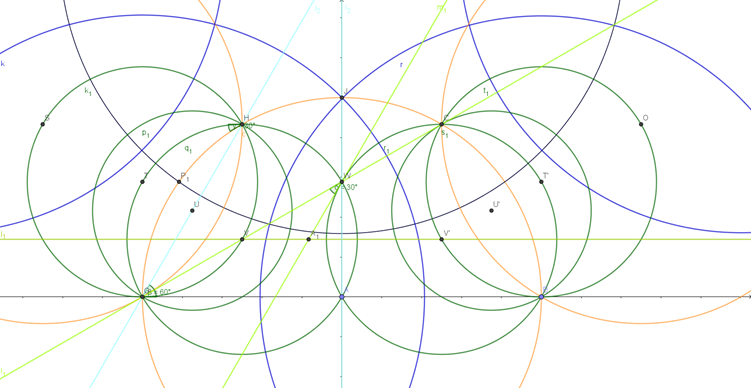
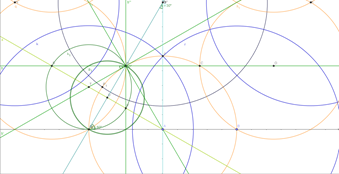
- Replicating the newly formed circles is simple by reflecting required centres in an axis (blue) as shown above and copying their radii. These new circles share an intersection at W as shown.
- Next, repeat the construction for rotating line VW in increments of 30 degrees as done before and plot intersections on the line VV’ (polar).
- The intersections after rotating the line are A1, B1, C1 which shall yet again be centres of orthogonal circles concurring at W(pole) this time.
- The new set of orthogonal circles (red) is smaller and also helps create smaller tiles approaching the edge of the hyperbolic disc.
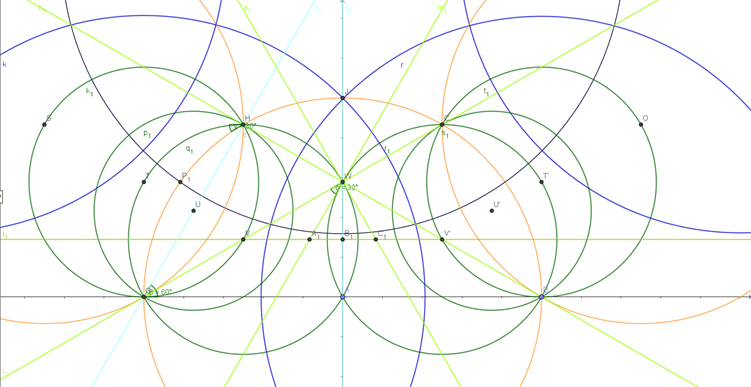
- Review the construction steps from 10 to 19 and observe the triangle tiles being added and the repetition in the procedure.
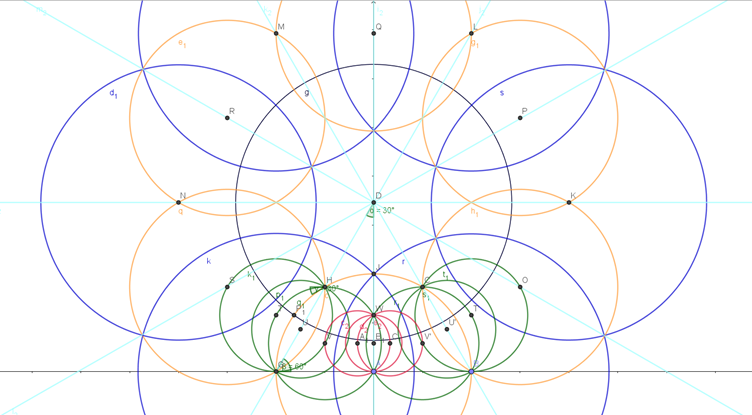
- Drawing the axes for reflections (light blue) can make repeating the circles more efficient. Repeating the along every edge until each edge has the last set of circles (red) can create a sufficiently intricate tiling of the disc. Yet by repeating the above steps to create tiles where there aren’t complete triangles can make it approach to very minute tiles in a mathematically accurate way.
The tiles can be transformed into motifs as done by Escher and that may not require very complex tiling but just an intuition as to how the tiles are warping as they approach the circumference.

The above steps are completely possible while using a straight edge and a compass. But it can be made efficient by using softwares like GeoGebra, Geometer’s Sketchpad or even any software with procedural capabilities (Houdini, Unity, etc). The approach while using software though can have two choices: first is to replicate the above Euclidean procedure and the second being to actually create hyperbolic lines and circles (defining a hyperbolic system in the program) to plot the triangles and procedurally repeat them to tile the disc with higher accuracy.
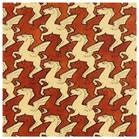
Serjan Burlak’s ‘HEX ‘ artwork
References:
- http://www.ams.org/samplings/f...
- http://www.malinc.se/m/ImageTi...
- http://www.math.cornell.edu/~d...
- http://ium.mccme.ru/postscript...
- http://www.ms.uky.edu/~droyste...
- http://citeseerx.ist.psu.edu/v...